BUILDING THE TAMIYA SKYRAIDER
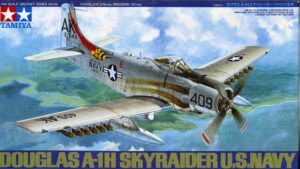
The most commonly built Skyraider kit is undoubtedly this 1/48 scale offering from Tamiya.
First produced in 1998 Kit #61058 still holds up pretty well even though it is getting a little long in the tooth. Let’s be realistic though, given there are at least 4,456,996,568-odd more iterations each of the Bf-109, P-51, Fw-190, Zero and Spitfire for the industry to “think out the box” upon it is highly unlikely we will ever see a worthwhile update or replacement for this venerable old box of plastic.
Thus, we Spad aficionados best resign ourselves to working with what’s in hand. That said, what we have isn’t really all that bad, truth be told. The kit is definitely a child of its time after all and cannot reasonably be disparaged for this. On the plus side, the shapes are all accurate, the detail pretty much acceptable and the fit, typical for Tamiya, outstanding even after all these decades.
On the downside, though, there are some definite, often serious, issues. Worse yet, years of observation has illustrated to me very few of this kit’s builders ever bother addressing any of them. This is a shame because the result is any number of otherwise excellently built up examples sadly marginalize themselves as viable scale representations of a great airplane.
What issues? Well,
- Much of the “detail” and construction is gimmicky, way too oversimplified and at times downright Mickey Mouse, especially for the scale.
- There are some glaring omissions which better research on the part of the manufacturer should have avoided, particularly on the USAF A-1J boxing.
- The worst aspect, however, is the wing assembly which if not aggressively corrected renders the entire finished product looking like a sad, hunched old derelict with all the aspect of an overdone grilled cheese sandwich held too long over a hot burner.
By my reckoning with will be my 16th Tamiya Skyraider. (There are still several in the stash too; don’t misunderstand, I like this kit…) Along the way I’ve developed a couple of tricks to deal with its issues and thought I might share them here for anyone interested.
This is a fresh build; not a rehash of something I did years before and I’ll be presenting it here in serial format as I go along, so stay tuned. There will be a few rules of engagement as well:
- This is not an “Out of the Box” build. I mean, c’mon, that’s the whole point: if so built the old girl simply can never be taken seriously.
- It will represent a Vietnam Era Navy A-1H exactly as shown on the box. (…well, almost anyway; see point #7 below…) The point is I will not be converting it to any other configuration, service or time frame.
- All modifications and/or substitutions will be what I consider necessary improvements over what comes in the box for basic scale accuracy. These are basic operations I do every time I approach this kit.
- I will not be “super detailing” or scratch building anything.
- Any substitutions or add-ons will come from readily available aftermarket products or easily sourced findings and only used if I feel they are necessary to get the best from the basic kit.
- Only basic modeling tools and techniques will be used; no fancy-shmancy in-house 3D design/printing, laser or die cutting or CNC voodoo-hoodoo on this one.
- There WILL BE ZERO HINT OF ANY VERKOCHTE BUMBLY-BUZZ THINGY anywhere near the finished product. That demon has been thoroughly exorcised, banished into the swine and my shop cleansed clew to earring of all its infernal visages. Hallelujah! Behold: yon bright silver dawn into a far, green country and, verily, all Skyraiderdom is the better for it. (…swelling John Williams anthem…see the blog)
So, let’s dive in and see what comes of it.
BUILDING THE TAMIYA 1/48 SKYRAIDER-PART ONE
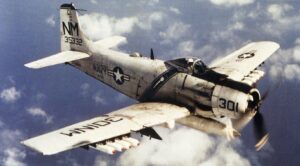 Here’s Viceroy 301, the airframe we will be producing. “Viceroy” was the call sign for VA-52 and from the “NM” modex we can ascertain A/C 301 had joined their third Vietnam cruise aboard USS Ticonderoga (CVA-14) sometime between 15 October 1966 and 29 May, 1967. According to Osprey’s US Navy A-1 Skyraider Units of the Vietnam War, p95, BuNo/SN 135322 survived combat ops with the USN, USAF, VNAF and was purchased from Thailand after the war, brought to the U.S. and is now privately owned and operated as a warbird here.
For this project I’m going to reproduce the wear and weathering but will rearrange the weapons loadout for a different mission (Scan: op. cit. p63)
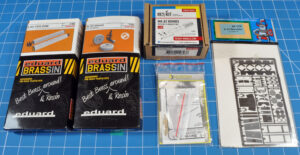 This is the aftermarket I’ll be using for this build. Some of it is subject specific, other parts are absolutely essential to make the finished product worth the effort. Everything here is covered in the reviews section so I won’t reiterate here; instead, I’ll discuss the application of each where it fits into the process.
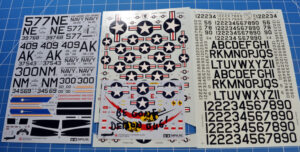 The decals. Actually, the kit sheet will provide the majority of the markings. Because we’re doing an airframe different to the CAG bird represented in the kit secondary sheets will be used to supplement where necessary. National markings will also be sourced from a better sheet.
